
How to Build a Gaming PC: Complete Step-by-Step Guide
By the RigVault Hardware Team
Building your first PC feels intimidating right up until the moment you actually do it — then most people realize it’s closer to assembling furniture than performing surgery. This guide walks through the entire process: budgeting, picking parts, gathering tools, and assembly, without the jargon overload that makes most guides harder than the build itself.
Step 1: Set Your Budget and Understand Where It Goes
Before touching a single part listing, decide your total budget. Component prices shift throughout the year, so treat any price you see as a snapshot rather than a fixed number.
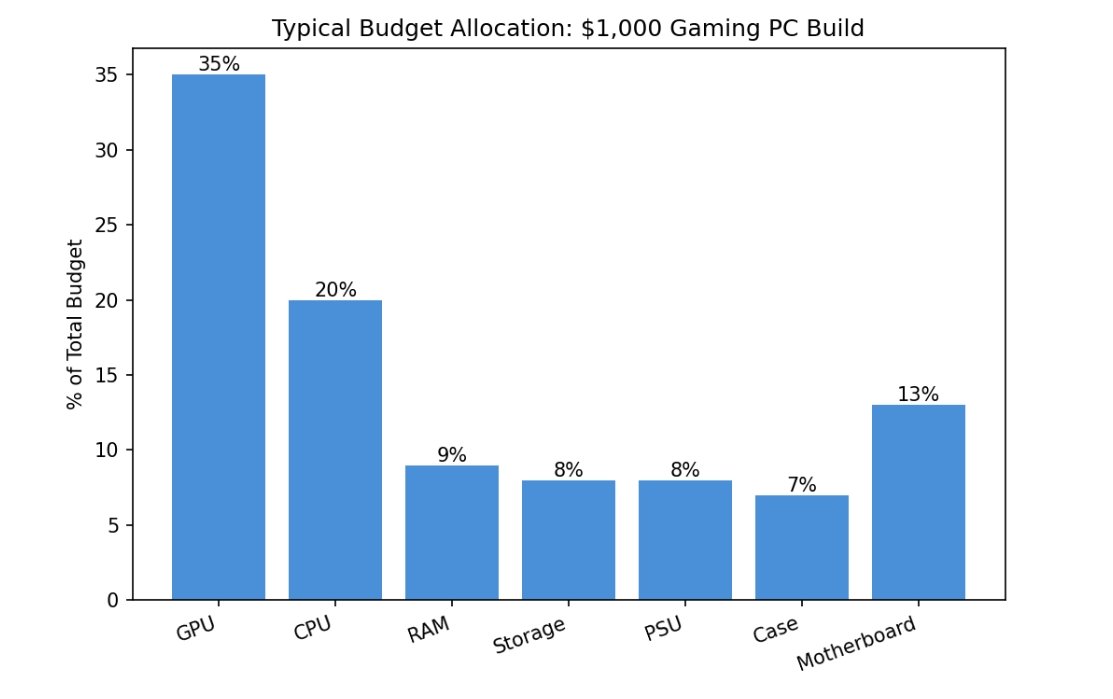
As a rough guide, the GPU should get the largest single share of your budget — typically around a third — since it does the most to determine your actual gaming performance. The CPU comes next, followed by the motherboard, with RAM, storage, PSU, and case splitting the remainder relatively evenly.
Step 2: Build Your Parts List
The Full Parts Checklist
Confirming compatibility across this list before you buy anything is the single highest-value step in the entire process — it prevents the most common (and most frustrating) first-build mistakes
read our full compatibility checklist before buying parts
Step 3: Gather Your Tools
Beyond the parts themselves, you’ll need:
• A #2 Phillips screwdriver, ideally magnetic-tipped
• An open, well-lit workspace — a cleared table or desk works fine
• Anti-static protection — a wrist strap, or simply touch a grounded metal object regularly
• Your case’s manual or a quick look at the manufacturer’s install guide
Step 4: Prep the Motherboard Outside the Case
Install the CPU, RAM, and M.2 SSD onto the motherboard before it goes into the case — it’s far easier to work with the board flat on a table than crammed inside a case chassis.
1. Open the CPU socket lever, align the CPU using the corner arrow markers, and lower it gently — never force it into place.
2. Snap RAM sticks into the motherboard’s recommended slots (check your manual; the correct dual-channel pairing is often not slots 1 and 2).
3. Slide the M.2 SSD into its slot at an angle and screw it down flat.
Step 5: Install the Power Supply and Motherboard in the Case
Mount the PSU first, then lower the motherboard onto the case standoffs and secure it with the provided screws. Snug is enough — overtightening risks cracking the board.
Step 6: Add Storage, GPU, and Cooling
• Install any additional drives into their case trays.
• Insert the GPU into the top PCIe slot and secure it to the case bracket
.
• Mount your CPU cooler according to its specific instructions — air coolers and AIO liquid coolers differ significantly in this step.
not sure which cooler to pick? Compare air vs liquid cooling
Step 7: Cable Management and Power Connections
Connect the 24-pin motherboard power, the 8-pin (or 4+4) CPU power, GPU power cables, and front-panel connectors (power button, USB, audio). Route cables behind the motherboard tray where possible — it’s not just cosmetic, it genuinely improves airflow.
read our full cable management guide
Step 8: First Boot
Connect a monitor, keyboard, and mouse, then power on. If it boots to a BIOS screen, you’ve succeeded. If nothing happens, the most common culprits are the front-panel power switch cable, an unseated RAM stick, or an unconnected CPU power cable.
Common First-Build Mistakes to Avoid
Beyond the steps above, a handful of small mistakes account for most first-build headaches: forgetting to install the motherboard’s I/O shield before mounting it, using too much or too little thermal paste, and overtightening case screws. None of these are difficult to avoid once you know to watch for them.
How Long Should Your First Build Take?
Budget 2-4 hours for your first build, including double-checking each step as you go. It gets significantly faster after your second or third build, once the sequence becomes familiar.
Choosing Parts for Your Specific Resolution Target
Before finalizing your parts list, decide whether you’re building for 1080p, 1440p, or 4K gaming — this single decision should drive your GPU choice more than any other factor. A 1080p-focused build can comfortably run on an RTX 5060-class GPU, while 1440p pushes you toward an RTX 5070 or RX 9070-class card, and 4K realistically needs an RTX 5080 or RTX 5090 to stay smooth without leaning entirely on upscaling.
see our full 1440p GPU buying guide
Once your GPU tier is set, the rest of your parts list should scale around it — there’s little point pairing a flagship GPU with a bottom-tier PSU or an undersized case that can’t fit it.
CPU Selection: Don’t Overspend Here
A common first-build mistake is spending too much of the budget on the CPU relative to the GPU. For most gaming-focused builds, a mid-range current-generation CPU paired with a stronger GPU delivers better real-world performance than the reverse allocation. Reserve CPU-heavy spending for builds that also handle streaming, video editing, or other demanding background workloads
RAM: How Much Do You Actually Need?
16GB is a reasonable minimum for gaming in 2026, but 32GB has become the more comfortable standard, especially if you multitask, stream, or keep a browser with many tabs open alongside your game. Buy RAM in a matched dual-channel kit rather than a single stick — running in dual-channel mode delivers a meaningful performance boost over an equivalent single-stick capacity.
see our full RAM capacity and speed guide
Storage: NVMe as the Default Choice
For your primary drive, an NVMe SSD is the default recommendation in 2026 — the pricing gap over SATA SSDs has narrowed enough that there’s little reason to choose the slower option for your boot and game drive. A 1TB NVMe SSD is a reasonable starting point, with 2TB worth considering if you maintain a large game library.
see our full storage comparison guide
Case Selection: Airflow Matters More Than Looks
For your primary drive, an NVMe SSD is the default recommendation in 2026 — the pricing gap over SATA SSDs has narrowed enough that there’s little reason to choose the slower option for your boot and game drive. A 1TB NVMe SSD is a reasonable starting point, with 2TB worth considering if you maintain a large game library.
see our full storage comparison guide
Building for Upgradability From Day One
Even if your current budget only stretches to a modest build, choosing a motherboard with a spare RAM slot and an extra M.2 slot, plus a PSU with headroom beyond your current GPU’s needs, sets your system up for cheaper incremental upgrades later rather than a full rebuild.
see our full future-proofing checklist
Planning Your Workspace Before You Start
Set up your build space before your parts arrive: a clean, static-safe surface, good lighting, and enough room to lay out components without them overlapping. A little preparation here prevents the common frustration of hunting for a dropped screw or losing track of which cable goes where mid-build.
Conclusion
Your first PC build is mostly about patience and double-checking compatibility before you buy, not raw technical skill. Set your budget, confirm every part fits together, gather basic tools, and follow the assembly order above. Once the parts are in hand, the process itself is straightforward if you take it one step at a time.